Consultancy and Programming
Technical Pages
About Us
Advice, tips, techniques and downloads for Visual Foxpro developers.
Versión en español de este artículo
We recently wrote a Visual Foxpro application that handled the registration of delegates attending an international conference. The client wanted the ability to photograph each delegate on arrival, and also to store scanned images of the delegates’ business cards. Because of the large number of delegates involved, the photography and scanning processes had to be as smooth and trouble-free as possible. It was particularly important for the operator to be able to control the camera and scanner while seated at his or her PC.
In this article, we will tell you how we went about this project. The appoach we adopted is reasonably generic and not specific to any particular scanning hardware. You should have no difficulty applying our techniques in your own applications if you wish.
 For the photography, we ruled out a standard
digital camera, mainly because we could not find a hands-off method of
transferring the images from the camera to our application. Instead, we chose a
Philips ToUcam web camera (left). This sort of device is more usually used for video
conferencing and as an on-line web cam, but it is also capable of capturing
single-frame snapshots. It has the advantage of being TWAIN-compliant and can be
controlled entirely from the PC.
 The scanner we chose was a Targus Mini Business
Card Scanner (left). As its name suggests, this is designed specifically for scanning
business cards. Like the camera, it is TWAIN-compliant.
Although we are happy to recommend both these devices, almost any make or model of web camera or scanner would have served our purpose. The code we will show you in this article is capable of capturing images from any TWAIN-compatible device.
There are many software products available that let you drive a TWAIN device programmatically. The one that we opted for was EZTWAIN, from Dosadi. We liked this product for the following reasons:
The EZTWAIN DLL has over 70 functions, but for most applications you will never use more than seven or eight of them. Here are the DECLAREs for the more common functions:
DECLARE INTEGER TWAIN_SelectImageSource ;
  IN Eztw32.DLL INTEGER hWnd
DECLARE INTEGER TWAIN_GetSourceList ;
  IN Eztw32.dll
DECLARE INTEGER TWAIN_GetNextSourceName ;
  IN Eztw32.dll STRING @cSourceName
DECLARE INTEGER TWAIN_OpenSource ;
  IN Eztw32.DLL STRING cSourceName
DECLARE INTEGER TWAIN_AcquireNative ;
  IN Eztw32.DLL INTEGER nAppWind, INTEGER nPixelTypes
DECLARE INTEGER TWAIN_WriteNativeToFilename ;
  IN Eztw32.DLL INTEGER nDIB, STRING cFilename
DECLARE INTEGER TWAIN_FreeNative ;
  IN Eztw32.DLL INTEGER nDIB
DECLARE INTEGER TWAIN_SetMultiTransfer ;
  IN Eztw32.dll INTEGER nFlag
If you only have one TWAIN device installed, simply call TWAIN_AcquireNative() to capture the image. This function initiates the capture process. When that has finished, the image will be present in memory, in device-independent bitmap (DIB) format. The function takes two integer parameters; in most cases these will both be zero. It returns a handle to the image.
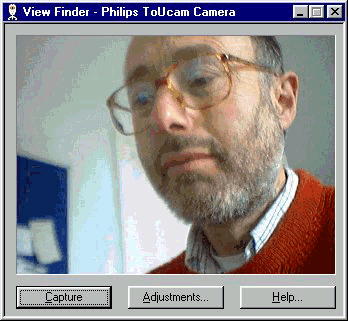
In the case of our ToUcam web camera, calling TWAIN_AcquireNative() launches the camera’s on-screen viewfinder (Figure 1). This displays a continuous feed of the image. At any time, the user can click on the Capture button to take the photograph.

Figure 1: This is what the user sees when you start capturing from the web cam.
Once the DIB image is in memory, you can call TWAIN_WriteNativeToFilename() to write it to a file of your choice. By default, this will be a BMP file, but other formats are also supported. You pass two parameters to this function: the DIB handle returned by TWAIN_AcquireNative(), and the qualified filename of the target file.
Finally, call TWAIN_FreeNative() to clear the DIB image. If you did not do this, you would quickly run out memory.
Here then is our code for taking a photograph with the web camera:
LOCAL lcFile, lnImageHandle, lnReply
lcFile = "c:\test\test_image.bmp"

* Get the image
lnImageHandle = TWAIN_AcquireNative(0,0)

* Write the image to a disk file
lnReply = TWAIN_WriteNativeToFilename(lnImageHandle,lcFile)

* Release the image handle
TWAIN_FreeNative(lnImageHandle)

* Check for errors
IF lnReply = 0
  * image successfully written to file
ELSE
  * something went wrong
ENDIF
Note that the reply from TWAIN_WriteNativeToFilename() tells you whether the file was successfully written. However, this does not tell you if the acquisition worked properly - the capture might have failed for some reason, or it might have been cancelled by the user. One way to test for that is to check the size of the resulting file; if it is zero, then no image was captured.
The above code will capture an image from whatever TWAIN device you have installed. If you have a scanner rather than a camera, the code will initiate the scanning process and save the scanned image.
But what if you need to handle two capture devices from the same PC? That was the case with our own application, in which the same user needed to control both the camera and the card-scanner.
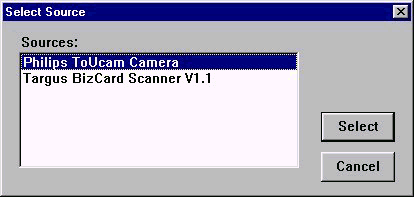
By default, TWAIN_AcquireNative() will capture from the first TWAIN device it finds. However, the EZTWAIN DLL has a function called TWAIN_SelectImageSource(), which gives the user the opportunity to select a different capture device. When you call this function (usually with 0 as the parameter), the user sees the standard TWAIN Select Source dialogue shown in Figure 2. The function returns 0 if the user cancels the dialogue or if no capture devices are installed, otherwise it returns 1.

Figure 2: The standad TWAIN dialogue for selecting the capture source.
In our case, we didn’t want the user to see this dialogue. Because our application had specific command buttons for the camera and the card-scanner, we wanted to select the device programmatically.
To do so, we used two further functions: TWAIN_GetSourceList(), which reads a list of device names into EZTWAIN’s memory; and TWAIN_GetNextSourceName(), which retrieves the next device from that list. After calling TWAIN_GetSourceList() once, call TWAIN_GetNextSourceName() repeatedly until it returns 0 to indicate that there are no more names in the list.
As an example, here is some code you could use to populate a combo box with the names of the available devices:
LOCAL lcSource, lnReply

* Get list of devices into memory
TWAIN_GetSourceList()

lcSource = SPACE(255)
DO WHILE .T.
  * Get next device name
  lnReply = TWAIN_GetNextSourceName(@lcSource)
  IF lnReply = 0
    * No more source names
    EXIT
  ENDIF

  * Trim trailing null, etc
  lcSource = LEFT(lcSource,AT(CHR(0),lcSource)-1)

* Add it to the combo
  THISFORM.cboDevices.AddItem(lcSource)
ENDDO
Once you know the name of the source, you can pass it to the TWAIN_OpenSource() function. This establishes the source for the next call to TWAIN_AcquireNative().
By default, TWAIN_AcquireNative() will close the capture source after the capture is finished. So, if you have more than one device, you will need to call TWAIN_OpenSource() before each call to TWAIN_AcquireNative(). Unfortunately, opening the capture source is time-consuming. Depending on the device, users might notice a delay of several seconds before the capture can start.
As an alternative, you can call TWAIN_SetMultiTransfer(1) to tell EZTWAIN to leave the capture source open. That way, you only need to call TWAIN_OpenSource() when you want to switch to a different source. When we tried doing this, however, we found that the viewfinder for the ToUcam camera stayed on the screen, in front of our own application’s window, the whole time. This obscured part of our application window. For that reason, we chose not to keep the source open.
In this article, we have tried to give you a flavour of the EZTWAIN DLL. This is an extremely capable tool, with many more functions than we have space to describe here. If you need to control one or more TWAIN devices from your Visual Foxpro application, why not download a trial copy and explore it for yourself.
For more information about EZTWAIN and other TWAIN-related products, and to download the trial copy of the DLL, visit www.dosadi.com.
Unfortunately, Philips recently discontinued the ToUcam web camera, but there are many low-priced alternatives around. One that we particularly like is the Logitech Quickcam Express, which can be ordered from:
The Targus card-scanner costs about US$105:
Mike Lewis Consultants Ltd. February 2003. Revised January 2006.
FoxStuff is maintained by Mike Lewis Consultants Ltd. as a service to the VFP community. Feel free to download and use any code or components, and to pass around copies of the articles (but please do not remove our copyright notices or disclaimers).
The information given on this site has been carefully checked and is believed to be correct, but no legal liability can be accepted for its use. Do not use code, components or techniques unless you are satisfied that they will work correctly in your applications.
© Copyright Mike Lewis Consultants Ltd.